


So, you’re ready to dip your toes into the world of automated trading. What does that even mean? Simply put, it's about using smart software to place buy and sell orders for you. You set the rules, and the system executes them without hesitation. This is a game-changer for beginners because it allows you to trade with the kind of speed and discipline that usually takes years to develop, all while taking emotional guesswork out of the equation.
If you've ever felt that jolt of panic before clicking "buy" or held a losing trade for way too long, hoping for a miracle, then you've already met the biggest enemy of any trader: emotion. Automated trading tackles this problem head-on by letting a computer do the heavy lifting. You create the strategy, and the system follows your instructions to the letter, day or night.
My goal with this guide is to cut through the confusing jargon and show you the practical side of automated trading for beginners. We'll focus on building your confidence and giving you a solid footing before you dive into setting up your own system with tools like EzAlgo and TradingView.
This isn't just some passing trend. The shift to automation is a massive movement reshaping the financial markets for everyone, from big Wall Street firms to everyday retail traders like us. In fact, the global automated trading market was valued at around USD 13 billion in 2023 and is on track to more than double, hitting nearly USD 27 billion by 2032. Those numbers tell a clear story: traders want more efficient and disciplined ways to navigate the markets. You can see the full market growth projections for yourself to get a sense of just how big this is.
To really see the difference, it helps to put manual and automated trading side-by-side.
Here’s a quick comparison to highlight the key differences between the old way of clicking buttons and letting a system handle the work.
As you can see, automation isn't just about convenience; it fundamentally changes how you can approach trading.
This growth is really driven by a few powerful advantages that automation offers:
The real magic of automation isn’t just placing trades faster. It’s about enforcing a cool, calculated, and unemotional approach to the markets—the very thing most new traders struggle with the most.
By learning to automate, you're not just picking up a new trading tactic; you're building a systematic process from the ground up. This guide is here to show you exactly how to get started, one clear step at a time.
This clean, powerful TradingView chart is about to become your command center. Once we load up the EzAlgo indicators, this is where you'll see signals, track trends, and ultimately build your automated strategies.
Let's turn this blank slate into a dynamic trading dashboard. The foundation of any solid automated system is having the right tools, and for us, that starts with TradingView and EzAlgo. Think of TradingView as your canvas and EzAlgo as your high-tech paint brushes—together, they give you everything you need to create a strategic masterpiece.
First things first, let's get your TradingView account set up. If you're new to the platform, signing up is a breeze. While the free plan is great for getting started, I strongly recommend a paid subscription if you're serious about automated trading. It lets you use more indicators at once and, crucially, gives you access to the server-side alerts that make true automation possible.
With your account ready to go, it’s time to bring in the EzAlgo indicators. This sounds more technical than it actually is.
Once you subscribe to EzAlgo, you'll get access to our private, invite-only indicators right inside your TradingView account. You won't find these in the public library; they're exclusively for our members.
Here’s how you get them onto your chart:
Let's say you add the EzAlgo Oscillator. It will pop up in a new panel right below your main price chart. This particular tool is fantastic for measuring momentum and identifying potential trend reversals, giving you clear buy and sell signals. For now, don't sweat the settings—we’re just getting the tools on the screen.
The goal here is simple: create a seamless flow of information. EzAlgo does the heavy lifting by analyzing the market and finding signals, TradingView visualizes them for you, and soon, we'll set up alerts to act on those signals automatically.
This hands-on approach to building a trading system is quickly becoming the new norm. You're not just following a trend; you're getting in on a massive shift in the market. The global automated algo trading market is projected to skyrocket from USD 19.6 billion in 2025 to an incredible USD 53.8 billion by 2035.
This explosion in growth shows just how much traders want tools that give them a real edge, without needing a background in coding. You can read more about these automated trading market forecasts to get a sense of where things are headed.
By combining TradingView's best-in-class charting with EzAlgo's powerful analytics, you’re basically giving yourself an institutional-grade toolkit. Now that the indicators are on your chart, you've officially built your trading dashboard. Next up, we’ll dive into what these signals mean and how to tweak the tools to build your first strategy.
Alright, you've got everything set up. Now for the fun part—let's build your first automated trading strategy. Don't let the term intimidate you. A "strategy" is just a simple rulebook that tells your system when to buy and when to sell. As a newcomer, the best approach is to keep it simple, logical, and easy to track.
The great thing about EzAlgo is that you don't need to be a coder. You'll define your rules by tweaking the indicator settings right on your TradingView chart. This hands-on method is fantastic for really understanding how each parameter changes the signals you get.
For your first go, I always recommend a trend-following strategy. The logic is as simple as it gets: figure out which way the market is heading and go with it. This helps you avoid one of the biggest rookie mistakes—trying to fight the market's momentum.
Let's walk through building a basic strategy using two of EzAlgo's most popular features. This will show you why combining indicators is so powerful; it’s like getting a second opinion before you commit to a trade.
Here’s what we'll use for our recipe:
The core idea is to wait for the oscillator to flash a buy signal while the main trend indicator confirms we’re in an uptrend. This confirmation step is your filter—it’s designed to weed out bad signals when the market is just chopping sideways.
While EzAlgo’s default settings provide a solid starting point, the real magic happens when you adjust them to the specific asset and timeframe you’re trading. For instance, a volatile crypto like SOL/USD will behave very differently than a blue-chip stock like Coca-Cola (KO) and will need different settings.
Open up the EzAlgo settings panel on your chart. You'll see sliders or inputs for things like "Sensitivity" or "Length." If you lower the sensitivity, you're telling the indicator to ignore minor price "noise," which usually results in fewer but higher-quality signals. If you increase it, the indicator becomes more responsive, giving you more signals.
A huge part of learning automated trading is experimenting in a safe space. Before you even think about connecting to a live exchange, use TradingView's backtesting features. This lets you see how your tuned settings would have performed on past data.
This constant process of tweaking and testing is what turns a random guess into a well-reasoned strategy. Over time, you’ll start to get a real feel for how to tune your tools. If you want more ideas, check out the different automated trading strategies our community members are using.
So, let's lay out the precise logic for our starter strategy:
This two-part entry rule is a core concept in system design. By requiring more than one condition to be met, you're adding a layer of confirmation that can really stack the odds in your favor. It’s a simple but incredibly effective foundation for you to build upon as you get deeper into automated trading.
Alright, you've spent the time crafting and backtesting your trading strategy in TradingView. Now for the exciting part: making it actually trade for you in the real world. This is where your strategy goes from theory to live execution. It might seem a bit technical, but it's really just a few logical steps to get your signals from the chart to your exchange account.
Think of it this way: TradingView is great at finding trades, but it can't place them on its own. It needs a messenger to carry its instructions to your exchange. This is where a webhook comes in. A webhook is simply a unique URL that acts like a dedicated phone line, waiting for a call from TradingView.
Services like 3Commas are built for this. They give you a special webhook URL that you'll plug into your TradingView alert settings. When your strategy spots an opportunity and triggers an alert, TradingView "calls" that URL, and 3Commas instantly translates that signal into a live order on your exchange. Simple as that.
So, how do you give a service like 3Commas permission to trade on your exchange? You do it with API keys.
An API key is basically a secure, limited-access password you generate directly from your crypto exchange (like Binance, KuCoin, or Coinbase). When you create your keys, the exchange will ask you what permissions to grant. This is the most critical step for security.
For trading automation, you only need to enable trading permissions. Never, ever enable withdrawal permissions. This is your safety net. It means the service can place buy and sell orders for you, but it can never move your funds out of your exchange account.
Once you have your API Key and Secret Key, you'll copy and paste them into your 3Commas account. This establishes the secure link, allowing the two platforms to communicate.
The single most important rule is to protect your API keys like you would your bank account password. Never share them, and ensure withdrawal permissions are always disabled. This one habit is fundamental to safe automated trading.
The final piece is telling the automation service what to do. This is handled right in the "Message" box of your TradingView alert. You’ll need to put a specific command in there that the service can understand.
For instance, the message might look like a short piece of code instructing the bot to buy 0.01 BTC at the market price. Each platform has its own unique syntax for these commands, so you’ll need to check their documentation to get the exact format.
Before you go all-in, do a quick test run. I always recommend this. Set up an alert to buy the smallest possible amount of an asset and let it trigger. Then, pop over to your exchange and see if the order went through. If it did, you know the entire connection is working perfectly. This little check takes two minutes but can save you from big headaches and costly mistakes down the line.
Automated trading is thrilling, but it's a double-edged sword. A system will execute a bad command just as flawlessly as a good one. This is why risk management isn't just some optional add-on; it's the bedrock that separates sustainable trading from a quick trip to zero. Your number one job isn't chasing profits—it's defending your capital.
Think about a "flash crash," those rare but very real moments when an asset's price nosedives in minutes. An unprotected automated strategy will just sit there and watch your account balance vanish. That's why building safeguards directly into your trading logic is non-negotiable.
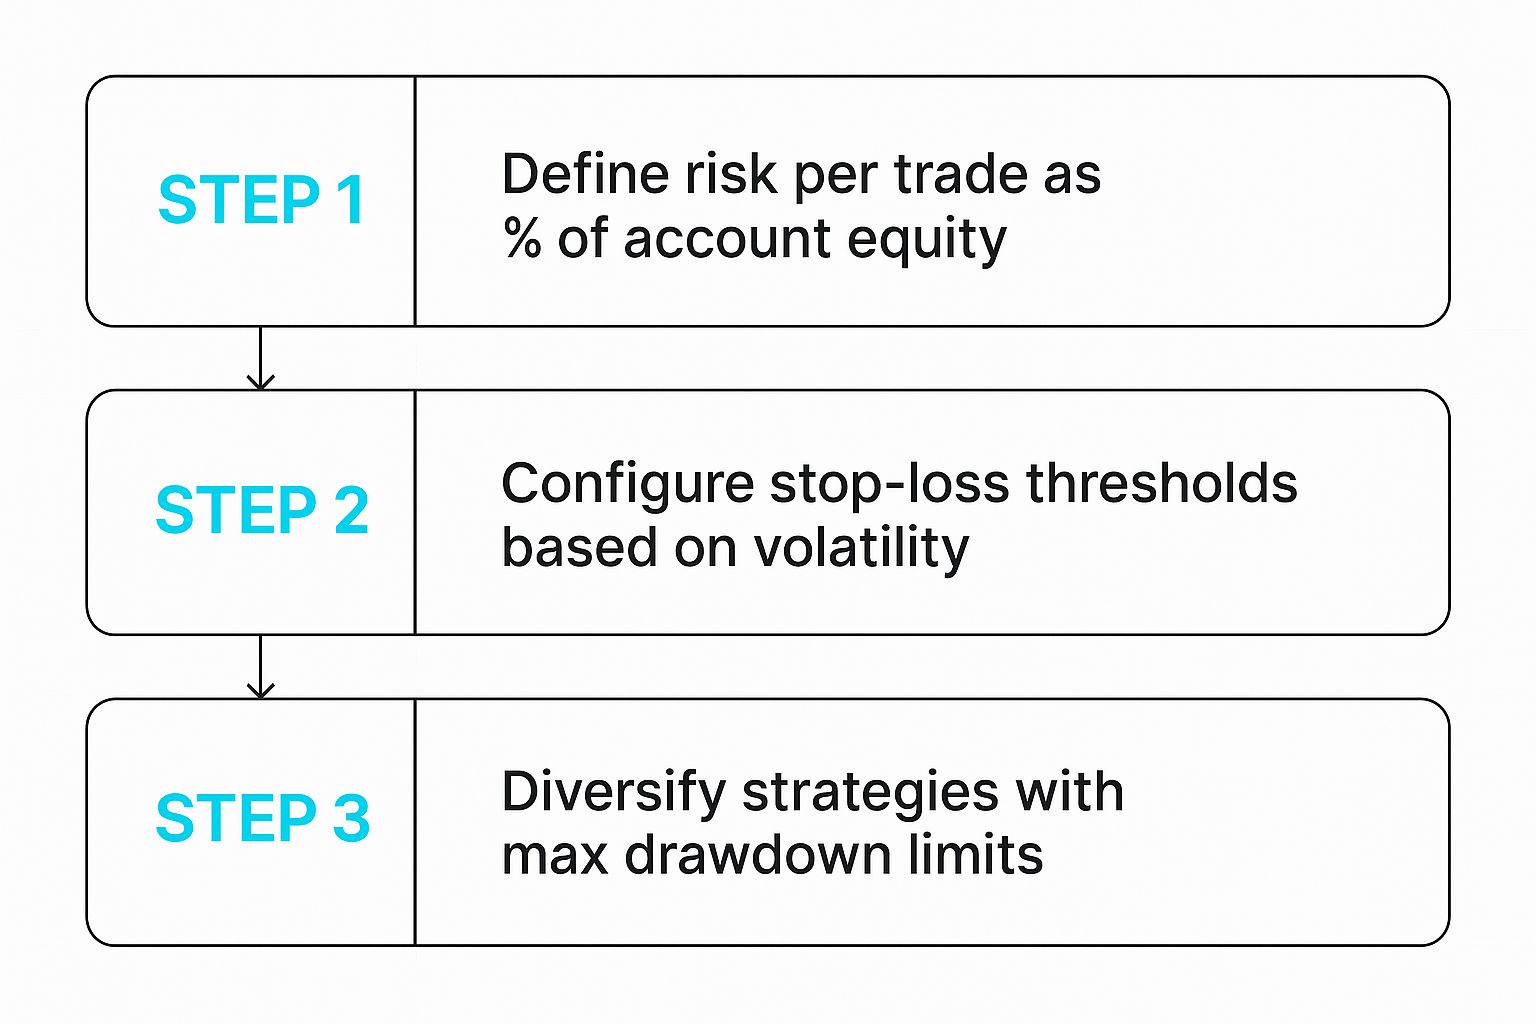
Your most basic shields are your stop-loss and take-profit levels. These aren't just lines you draw on a chart; they need to be baked into the actual alert messages you send from TradingView to your exchange. When your strategy triggers a buy signal, that same message must include clear instructions for where to exit if the trade goes south (stop-loss) or hits your target (take-profit).
This simple habit ensures every single position is protected from the second it goes live. I’ll say it again: never, ever open a trade without a predefined exit plan.
Position sizing is another piece of the puzzle. The classic rookie mistake? Going way too big on a single trade. A great starting point is the 1% rule: never risk more than 1% of your total account balance on any one trade.
Think of risk management like the brakes and seatbelt in a race car. You don't use them because you plan on crashing. You use them so you have the confidence to actually hit the accelerator. Without them, you're not trading; you're just gambling.
Leverage looks tempting because it can amplify gains, but it's a weapon that cuts both ways, and it cuts deep. For anyone new to this, my advice is blunt: stay away from it until you have a strategy that's proven to be consistently profitable. Using high leverage with an unproven automated system is one of the fastest ways I've seen traders wipe out.
This leads directly to the importance of data. Running a strategy without backtesting it is like setting sail in a hurricane because you didn't bother to check the weather forecast. Use TradingView's deep backtesting tools to see how your rules would have actually performed over months or even years of historical data. Pay close attention to the maximum drawdown—the largest single drop your account would have suffered. That number gives you a brutally honest look at the kind of pain your strategy might put you through.
Artificial intelligence has become a huge force in automated trading, changing how trades are analyzed and executed. While AI can process incredible amounts of data, it also brings up challenges with transparency and how it handles totally unexpected market events. This just reinforces the need for solid, human-led risk management. If you want to understand more about its broader impact, you can read about how AI is being used in modern trading systems.
Ultimately, getting these principles right is what will keep you in the game long enough to succeed. For a much deeper dive into protecting your capital, I highly recommend our complete guide on risk management for traders. It's an essential read.
Dipping your toes into automated trading for the first time? It's completely normal to have a bunch of questions. This is a different way of approaching the markets, and a healthy dose of curiosity means you're on the right track. Let's walk through some of the most common things beginners ask so you can move forward with confidence.
Not only can you, but you absolutely should. I always tell new traders to start with an amount of money they are genuinely okay with losing. Think of it as the cost of your real-world trading education.
Starting small lets you pressure-test your entire system—your strategy, your settings, your connection to the exchange—without putting serious capital on the line. Your first goal isn't to hit a home run. It's to learn the ropes, see how your bot behaves when real money is involved, and get comfortable with the whole process. Once you've got a system that's proven itself, you can think about scaling up.
A handful of lucky wins doesn't make a strategy "good." A truly solid strategy proves its mettle over hundreds of trades. The best place to start your evaluation is right inside TradingView using its backtesting engine. This lets you see how your idea would have performed against past market data.
When you run a backtest, don't just look at the final profit. You need to dig into the key metrics:
A great backtest is a fantastic sign, but it's not a guarantee of future results. The next crucial step is forward-testing with a small, live account to see if the strategy holds up in today's market.
Hands down, the most common and damaging mistake I see is a total disregard for risk management. New traders get obsessed with finding that magical entry signal, but they completely forget to plan for what happens when a trade inevitably goes against them.
Remember, an automated system will follow your rules to the letter—even if they're terrible rules. If you don't program a stop-loss, your bot isn't going to create one for you. This is how a single bad trade, fueled by an unexpected news event, can blow a massive hole in your account before you even have time to react.
Not anymore. That's the beauty of modern tools. Platforms like TradingView, paired with indicator suites like EzAlgo, were built specifically for traders, not programmers. You can build, test, and launch a complex strategy just by clicking buttons and adjusting settings in a visual interface.
While learning Pine Script (the language behind TradingView) can unlock another level of customization, it's absolutely not a requirement. You have everything you need to get started without ever looking at a line of code.
Ready to build your first automated strategy without any coding? Get started with EzAlgo and unlock our full suite of premium TradingView indicators, expert insights, and a supportive community. Explore EzAlgo today!


%201.svg)